How do I set up a voucher / coupon?
This article will explain step by step how you can set up a voucher or coupon for your clients to use. Vouchers can be created to offer a fixed amount or percentage discount for your clients on bookings
Different voucher types
There are 2 types of vouchers available
- Regular voucher
These vouchers are individual vouchers that have 1 specific discount code. They can be set for a specific period and the number of times they can be used can also be set as well
Example: Discount voucher for a birthday - For All (One time use per client)
This voucher code can be used for a specific period. The code can also only be used once per client.
Example: Discount code that can be used during the Christmas period for a 10% discount
Creating a voucher
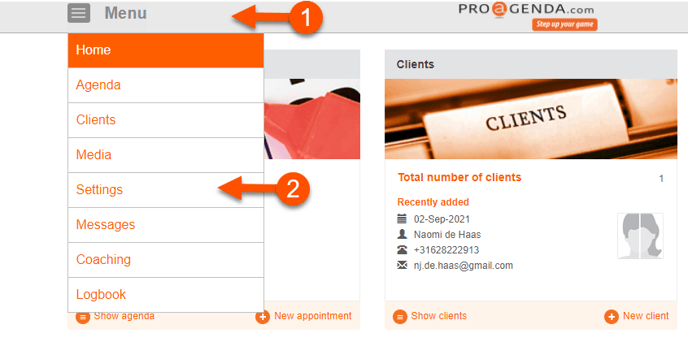
1. Click on _Menu_
2. Click on _Settings_

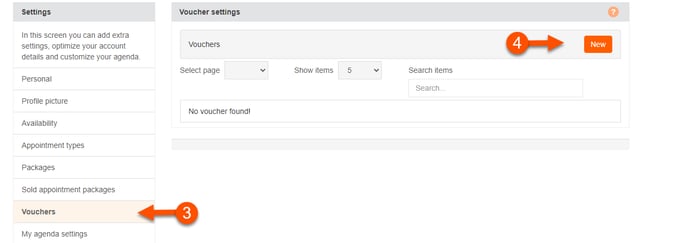
3. Click on _Vouchers_
4. Click on _ New_

Regular voucher
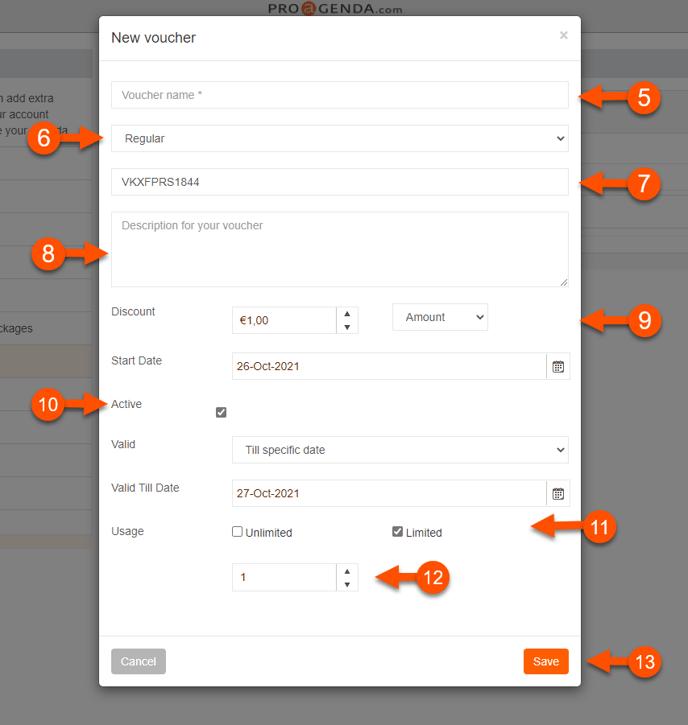
5. Fill in your vouchers name For example Birthday voucher
6. Select _Regular_
7. A voucher code will automatically generate; this code can be changed if needed but keep in mind that code needs to be unique
8. Fill in a description for your clients; this way, they’ll know the reason for the voucher.
9. Choose between two different discounts
- Amount (This is a fixed amount for example 10 USD)
- Percentage (This is a percentage discount based on the appointment type price)
10. Select when the voucher is valid
- start date (From this date the voucher can be used to make a booking)
- Active (By unchecking, this voucher becomes inactive immediately)
- Valid (Choose between a specific date or indefinite)
Example:
A birthday voucher with a start date of June 1st and an end date of July 1st can be used to make a booking during this period.
They can make bookings outside of this period as long as they make the actual booking during this period
The client can make a booking on June 12th for August 1st
11. Select if the usage is unlimited or a specific amount of times.
12. If the usage is limited, select the number of times the voucher can be used. (This goes for this specific voucher code)
13. Click on _save_
You can email a physical voucher to your client to print. To see how, check the following article:

For all (One time use per client)
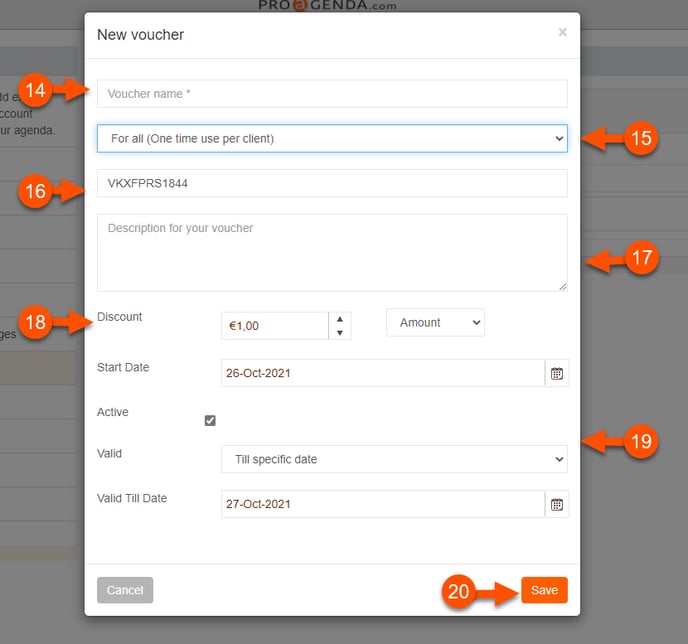
14. Fill in your voucher name. For example Christmas discount
15. Select _ For all_
16. A voucher code will automatically generate; this code can be changed if needed but keep in mind that code needs to be unique. For example CHRISTMAS20
17. Fill in a description for your clients. This way they’ll know the reason for the voucher.
18. Choose between two different discounts
- Amount (This is a fixed amount for example 10 USD)
- Percentage (This is a percentage discount based on the appointment type price)
19. Select when the voucher is valid
- start date (From this date the voucher can be used to make a booking)
- Active (By unchecking, this voucher becomes inactive immediately)
- Valid (Choose between a specific date or indefinite)
Example:
A voucher with a start date of June 1st and an end date of July 1st can be used to make a booking during this period.
They can make bookings outside of this period as long as they make the actual booking during this period
The client can make a booking on June 12th for August 1st
20. Click on _Save_

You can email a physical voucher to your client to print. To see how check the following article: How can I share vouchers with my clients
![logo inverted.png]](https://www.proagenda.com/hs-fs/hubfs/logo%20inverted.png?height=50&name=logo%20inverted.png)